I’m a little bit of a domain-hoarder. I admit it. And it shouldn’t be much of a surprise given how many jokes there are about developers buying up domains for projects that they’re never actually going to do.
This puts me in a good place to talk about the domain acquisition process and how it relates to custom Bluesky handles. It’s hardly a unique place and there are already dozens of articles like this one in the world (I mean, I just linked to the official Bluesky post about them) but I’m going to try to go end-to-end with the process and hope it helps some people out there, with a focus on the layperson who may have never owned a domain name before.
First, a bit about domain names.
Domain names are intended to make identifying Internet resources easier. They’re purchased (though, more accurately, they’re leased) via companies known as Domain Name Registrars. Domain names work in concert with the Domain Name System (DNS) so that (among other things), when someone types your domain name into their browser, they end up in the right place.
So, to buy (lease) a domain name, you would go to a domain name registrar and complete the purchase. At the domain name registrar, you would set what are known as nameservers for the domain. This tells the world where the DNS records for that domain exist. Then you would create the appropriate DNS records for the domain.
All of that can sound scary but here’s the trick: If all you’re worried about is a cool Bluesky handle, you can ignore most of it.
Lets say that you’re the Novel Nightmares book club. You’ve recently migrated to Bluesky and you want to register NovelNightmares.com and use it as your Bluesky handle.
First, you need to choose a domain registrar to make your domain purchase through. My personal choice of domain registrar is Namecheap and I’ll use them for examples going forward.
You go to Namecheap, sign up for an account, and search for NovelNightmares.com. It’s available, you add it to your cart, and you complete your purchase.
I’m glossing over those steps because, for the most part, the check-out process for purchasing domains is the same as the check-out process for purchasing anything else.
So you’ve completed the check-out process and head back to your dashboard, where you see your NovelNightmares.com domain registration as recently active. Congrats, you now own the rights to NovelNightmares.com!

Now it’s time to jump back over to Bluesky to start the process of changing your handle.
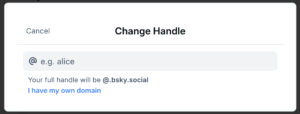
You click on the “Settings” tab and choose “Account” and then “Handle” to access the “Change Handle” dialog. You’re prompted to simply choose a new handle at the bsky.social domain but there’s also a “I have my own domain” link.

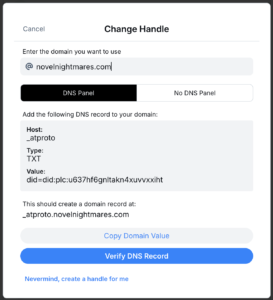
You now have your own domain, so you click that. And you land on a dialog that’s asking you to do a bunch of technical stuff with DNS. Oh crap.

You enter “novelnightmares.com” as your handle but still have no idea what the rest of that means. No worries; it’s way simpler than it looks.
You swing back over to Namecheap and click on the “Manage” button next to NovelNightmares.com on your dashboard.

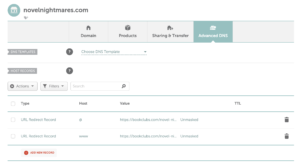
Right at the top of that page, there’s a big button for “Advanced DNS.” It’s scary-sounding but you’re going to click it anyway.

At the top there’s a “DNS Templates” section, which you can ignore. The “Host Records” section that comes next is the important one.
You might see some records here already. Maybe you went off-script and already set up some redirects, for example. The important thing is that red “Add New Record” button. You click that button and it’ll immediately ask you what type of record you want to create. Over on the Bluesky side of things, they already told you what kind of record to create: a TXT record. So you select that.

Now it’s asking you for the host and the value, which Bluesky also already gave you. The host is _atproto and the value is a unique string that starts with “did=” (in this case, did=did:plc:u637hf6gnltakn4xuvvxxiht). You can keep the TTL (time-to-live, which doesn’t need to be explained further in this context) as “Automatic” and click the green check mark to save your new record.
Congrats, you have a new TXT record in your domain name’s DNS! All that stuff I said about setting nameservers up above? You skipped that entirely because Namecheap did it for you. And if you want to use a different registrar, many of them have similar tools available.
Now you can swing back over to Bluesky and click the “Verify DNS Record” button. Assuming none of the Internet Tubes are clogged, the domain will be verified and you’ll have a new button, “Update to novelnightmares.com.” You click that and your Bluesky handle is now @novelnightmares.com.
But wait! What if you want to get just a little fancier?
You’ve got the Novel Nightmares account running as @novelnightmares.com but you want all of the book club admins to also have a Novel Nightmares-branded handle. In this case, Jane the Admin would no longer be @NovelNightmaresJane.bsky.social, she’d be @jane.novelnightmares.com.
This is possible because all Bluesky handles are also domains. It doesn’t matter if they’re a root domain (novelnightmares.com) or a subdomain (jane.novelnightmares.com). Even the default handles are all subdomains of the bsky.social root domain. The root domain doesn’t have to be a Bluesky account for there to accounts using subdomains based on it. There doesn’t have to be a website at a domain used as a handle. All you need to be able to do is create those DNS records.
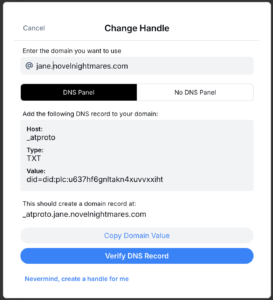
So Jane follows that “Change Handle” process at Bluesky and chooses @jane.novelnightmares.com as her handle. Bluesky gives her DNS record information, as we saw earlier.

She heads over to Namecheap and creates a new TXT record and uses her DID as the value. But she does not enter _atproto as the host.
This is something that the Bluesky Change Handle dialog makes somewhat confusing. It says that the host should be _atproto but, below that, it says that the domain record should be created at _atproto.jane.novelnightmares.com. To accomplish the latter, in this context, the host needs to be _atproto.jane.
So she enters _atproto.jane as the host and saves the record, then heads back to Bluesky, validates the DNS, and finishes updating her handle to @jane.novelnightmares.com.
That’s it. Even with the slightly-more-complicated subdomain case, there’s nothing particularly complicated, just a lot of jargon that can be confusing to the layperson.
Updated on 11/20/2024 to account for the fact that Bluesky buried the “Change Handle” dialog under an additional level of menu.


