
Over at DetroitHockey.Net, how I format my posts is constantly evolving. One of those changes is around the concept of a “matchup image.”
Way back in 2005 I rebuilt the site in such a way that big headline stories were expected to include some kind of featured image. I took photos at every game I went to, so I could usually scrounge up some thing to run with a story, even if it wasn’t recent. But sometimes I would write pre-game or postgame notes and I just didn’t have anything, which is where the matchup image came in.
The first matchup images were just the Red Wings’ logo and their opponent’s logo on a grey background. For special events, I’d include the event logo as well. Despite the ridiculously simple template seemingly ripe for automation, these were all hand-crafted in Photoshop.


After awhile, I changed the site template again and those images weren’t as necessary. Last season, though, I switched the site template yet again and found myself needing them. And this time I wanted the images to be dynamically generated. So I updated that universal template, giving it a two-tone grey background with a black divider and the same DetroitHockey.Net watermark/treatment that I’d been using for some other images. This time, unique versions were created for home and road games, with the home team logo appearing on the left and the visiting team on the right.


I could do this dynamically because DetroitHockey.Net includes a database of team logos. So the repeated parts of the matchup image got saved off as a template and I wrote up a script that would run weekly, look ahead at the Red Wings’ schedule for the next week, and slap the appropriate team logos onto that template, then load it into WordPress if it wasn’t already in there.
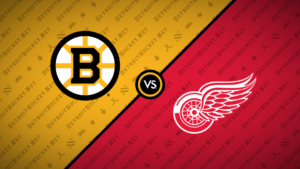
Simple. Except… Always using grey makes the DH.N home page really boring. Just really repetitive. I knew I wanted to find a way to get team colors onto those images. So I updated the logo database to include the primary color that each logo could be placed on.
And then I updated it again because some teams have primary logos that don’t work when placed on their primary color. The Tampa Bay Lightning, for example, have a solid blue logo with no outlines. Their primary color is blue. When used on blue, their logo is supposed to be white. So the database needed to be able to understand that.
With this new information in place, I could build a matchup image that used each team’s primary color and the appropriate logo.


Then I ran into yet other problem. The divider portion of the image was black when the backgrounds were grey. I designed the new matchup image template expecting that divider to be white. But white doesn’t contrast well against the yellow of the Pittsburgh Penguins or Boston Bruins. And black doesn’t contrast well against the Los Angeles Kings. So this time the code would need to be aware of the contrast between each of the team colors and the divider and choose a divider appropriately.
There were a few things I learned in the process of putting all of that together, so here’s how the code for a bunch of that turned out…
There are five template images; one with the (new) DetroitHockey.Net watermark, one with the gradient effect that gets applied to each image, and three divider images in white, black, and gold.


We start by building a GD image resource (yes, this could be done in ImageMagick but I do a lot with GD out of habit even though it’s slower) with the team colors. This is as simple as drawing two polygons on each side of the image, then filling them with the appropriate colors. The ring at the center of the image, inside the divider, is intended to be in the home team’s color, so we add a circle in the home team’s color.

Then we load in the watermark template. To get the effect we want, we go pixel-by-pixel in the watermark image and the team color image and multiple the watermark colors by the team colors, then assign that new color to the corresponding pixel on yet another GD image resource. I wrote a method for it that looks like this:
It’s genericized a bit because I use it later in the process.
Next we have to determine which divider contrasts the team colors best. This makes use of a couple methods from my Color package. We check to see if white contrasts with both team colors and, if it does, use that divider. If not, we move on to checking black. If black doesn’t contrast well enough, we determine which option (of white, black, and gold) is the best option. We don’t just default to gold because what happens in some cases we might determine that white doesn’t contrast well against the home team color and black doesn’t contrast at all against the away team color but it turns out gold contrasts horribly against the home team color so, even though white isn’t great, it’s better than anything else. We don’t skip straight to the best contrast check because if white contrasts enough (even without being the best contrast), we want to use it, and if black contrasts enough, we want that as the first fall-back.
There are a few values abstracted away but that whole process looks like this:
With the proper divider color determined, we copy it into our image via imagecopyresampled.
We do the above mentioned mergeImagesMultiplied to apply the gradient treatment to the image, then we pop the team logos in with imagecopyresampled and that gives a completed matchup image.


[…] fall I wrote about how I had changed the design of the “matchup images” at DetroitHockey.Net. This marked a new design after one season with the previous […]